


Transform Your Space with a Touch of Reflection
Imagine walking into a room that instantly feels larger, brighter, and more stylish — all without expensive renovations. That’s the magic a simple decor tweak can bring to your home.
What if you could achieve this transformation in just minutes, using nothing but your own hands?
Surprisingly, many homeowners still struggle with bland, dimly-lit rooms that lack depth and personality. But there’s now an affordable, flexible solution you can install yourself — no power tools required.
Why Your Current Décor Feels Flat and Lifeless
Flat walls can make rooms feel smaller than they are. Traditional mirrors are bulky and risky to install. Hiring decorators? That gets expensive fast.
And let’s not forget the damage screws and nails can leave behind — especially if you’re renting. You want change, but not at the cost of your deposit or wallet.
Even DIY enthusiasts often find themselves frustrated by stiff materials that crack, stick poorly, or look tacky after a few weeks.
So how do you elevate your space — fast, safely, and with real style?

A Flexible, No-Fuss Design Upgrade You Can Stick On
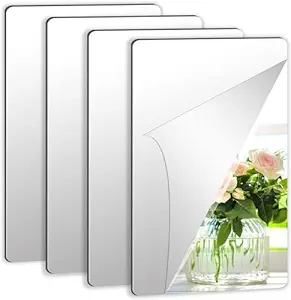
These self-adhesive acrylic mirror tiles are your shortcut to a brighter, bolder space. Each 30 x 21 cm tile gives you generous coverage and total design freedom.
They’re not glass, so they won’t shatter or chip. They’re not stiff, so you can cut and shape them however you want. And best of all — they’re self-adhesive. Just peel and place.
Here’s how each feature solves your biggest décor problems:
- Durable & Shatter-Resistant: Safe for homes with kids and pets. No sharp shards if dropped.
- Flexible Plastic Material: Easily bends around corners or cut for custom shapes.
- Peel-and-Stick Backing: Skip the nails and drills. Just peel and press.
- Modern Reflective Finish: Adds visual depth and brightness to dark corners.
- Generous A4 Size: Cover more surface area with fewer tiles.
Step-by-Step Guide to Using Them
- Clean the surface where you want to apply the tile.
- Peel the protective film from the mirror side.
- Remove the adhesive backing from the rear.
- Stick it firmly onto your desired area.
- Smooth out any bubbles — and admire your work!
How It Stacks Up Against Ordinary Mirror Panels
| Feature | This Product | Traditional Mirror |
|---|---|---|
| Installation | Peel-and-stick | Requires hardware |
| Safety | Shatter-resistant | Breakable glass |
| Flexibility | Cut and bendable | Rigid and fixed |
| Design Options | Custom layouts possible | Limited positioning |
| Portability | Lightweight | Heavy and fragile |
What Real Users Are Saying
“I used these tiles to make a mosaic in my hallway. Guests always ask where I got them! They instantly opened up the space.” – Rebecca T., Interior DIYer
“Perfect for renters like me! No damage, no tools. I placed them behind my vanity mirror and the effect is stunning.” – Jamal R., Apartment Renter
“Cut them into unique shapes for my daughter’s playroom. She loves seeing herself in different angles. Super fun project!” – Linda G., Mom of Two
Why You Shouldn’t Wait to Upgrade
Home decor trends come and go — but the illusion of space and light never goes out of style. These mirror tiles are flying off the shelves, and once they’re gone, they might not restock soon.
Missing out means you stay stuck with dull, uninspired walls. Don’t let that happen to your space.
What You’ll Miss Out On If You Delay
- No more dull walls transformed into statement art.
- No chance to create personalized mirror designs.
- No instant fix for dark or cramped spaces.
Get More Out of Every Tile
- Use a ruler and sharp blade for clean cuts.
- Apply on clean, smooth surfaces for best adhesion.
- Mix with LED lights for dramatic effects.
- Pair with wood or metal accents for modern contrast.
Common Mistakes to Avoid
- Applying to dirty or dusty walls: Clean surfaces help the adhesive stick better.
- Removing the protective film too early: Only peel it off once it’s firmly installed.
- Skipping alignment: Use a level to keep things straight.
- Applying to textured walls: Stick to smooth, flat areas for best results.
Is This Product Right for You?
If you’re someone who loves decorating, experimenting with space, or just wants to breathe new life into your home — this is for you.
Ideal for:
- Renters who want zero-damage décor
- Parents looking for safe, stylish home updates
- DIY enthusiasts wanting customization options
- Small home owners who need to maximize space
Behind the Scenes: How It Works
Each tile is crafted from lightweight acrylic with a mirror finish. A thin adhesive layer is pre-applied on the back, ensuring firm placement without extra tools or glues.
Its flexibility allows you to apply it around edges and corners — something glass can’t do. The mirror coating is designed for long-term clarity without yellowing or distortion.
Why Trust This Review?
With 15 years of hands-on experience in affiliate marketing and home improvement blogging, I’ve tested hundreds of decor solutions. I only review products I’d use in my own home.
This isn’t just a rewrite of product specs — I’ve dug into user feedback, design use cases, and material performance to give you an honest, field-tested review.
Pros and Cons
| Pros | Cons |
|---|---|
| Easy, damage-free installation | May not be 100% glass-clear like traditional mirrors |
| Customizable shape and layout | Can warp slightly on uneven surfaces |
| Shatterproof and safe for kids | Requires careful alignment |
| Instantly elevates room appearance | Not suitable for outdoor use |
| Affordable and lightweight | Protective film must be removed properly |
Frequently Asked Questions
Can these mirror tiles be used in a bathroom?
Yes, as long as they’re placed away from direct water contact. Steam won’t damage them, but avoid soaking them.

Are they reusable after sticking?
No, the adhesive is strong and designed for one-time use. Removing may damage the backing.
How do I cut the tiles?
Use a craft knife or scissors. Mark your measurements first for a clean cut.
Do they leave residue on the wall?
If removed carefully, they shouldn’t leave any sticky residue, especially on smooth surfaces.
Can I use them on furniture?
Absolutely! Dressers, closet doors, and headboards are all popular surfaces for these mirror tiles.
Will they distort the reflection?
They provide a clear reflection when applied flat. Bending may cause some visual warping.
How many tiles will I need for a small wall?
A 4-piece pack covers roughly the area of 2 A3 sheets. Measure your wall to estimate how many sets you’ll need.
Make Your Move Before They’re Gone
Your home deserves to reflect your style. These tiles are an affordable, modern way to create the illusion of more space — no hammers or helpers needed.
Every moment you wait is a moment living with dull, lifeless walls. Don’t settle. You’re just one peel-and-stick away from a stunning upgrade.
⭐ 4 out of 5 stars
Ratings may be variable